Notebooks and stacks
Evernote uses notebooks and stacks to help you organize information. We’ll talk about notebooks below and then move on to stacks on the next page. Before we begin, let’s make sure you can tell the difference between a notebook and a stack when looking at the Notebooks screen.
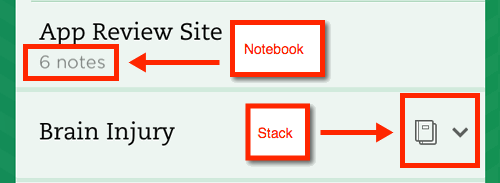
Notebooks are shown with the number of notes found within that notebook. Stacks do not show the number of notes and appear with an icon and a dropdown arrow.
Visual cues for notebooks vs. stacks
Viewing the contents of notebooks
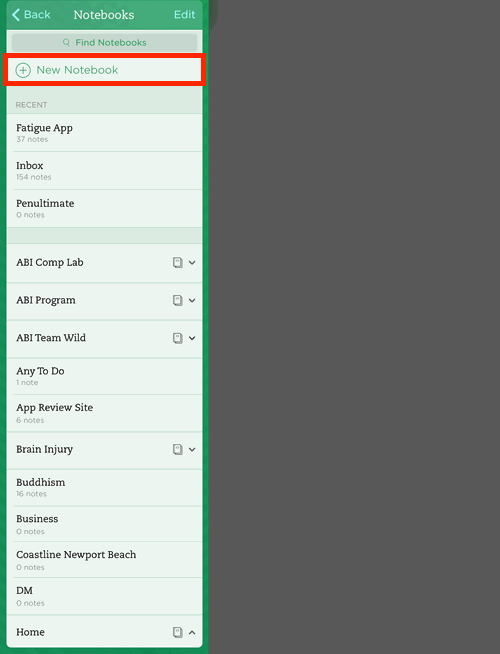
Notes can be arranged into notebooks (i.e., collections of notes). Notebooks make it easy to categorize notes and similar information. When in the Notebooks screen, Evernote shows the name of the notebook and how many notes are contained within it.
View existing notebooks and their contents
- Navigate to the main screen.
- Tap Notebooks.
- Tap the desired notebook to open it and see the notes it contains.
- To open a note, tap its title.
Creating notebooks
Creating separate notebooks can really help with organization. Make sure to think about the best name for a notebook—one that succinctly describes the type of notes it contains.
Create a new notebook
- Navigate to the main screen.
- Tap Notebooks.
- Tap New Notebook.
- Enter the name of the new notebook.
- Tap Done.
GIVE IT A TRY!
Add the following notebooks to the Evernote app.
- Add three sample notebooks (i.e., Sample1, Sample2, and Sample3) that can be modified and deleted as you progress through this lesson.
- Add a notebook for your Evernote training session.
- Add a personal or work-related notebook.
TROUBLESHOOTING
Problem: I added a notebook, but it appears at the bottom of the list.
Solution: Evernote organizes notebooks alphabetically. You can force a notebook to appear toward the top by starting the notebook name with the letter A (e.g., A Medical)
Notebooks screen
Assigning notes to a notebook
New notes are assigned by default to the Inbox, unless a different notebook is selected when the note is first created. It is a good idea to assign notes to a relevant notebook to help with organization and ultimately to help you find notes more easily. Sure, you can enter keywords into the search field, but having a strong organizational structure for your notes is an important strategy to implement.
Move a note to a different notebook
- Open the note.
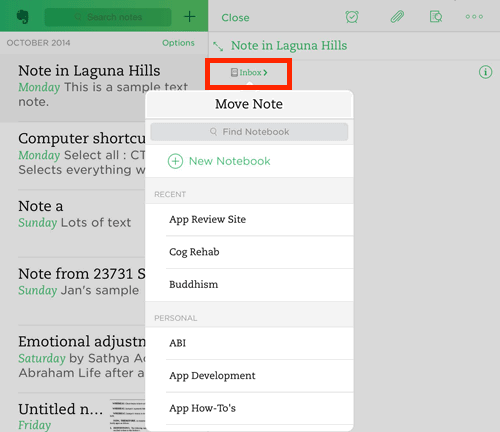
- Tap the Notebook reference just under the title of the note (the default notebook is Inbox).
- If necessary, tap and drag to view the list of existing notebooks.
- Tap the name of the notebook in which the note should be placed.
- Note the notebook reference changes under the title of the note.
- Tap the note to return to the note screen OR tap Close to return to the All Notes screen.
GIVE IT A TRY!
- Move at least two existing notes to two different notebooks you created previously.
Move Note screen
Renaming a notebook
You may find that you need to rename a notebook to clarify its contents or differentiate it from other notebooks. It is often better to have information saved in several notebooks for organizational purposes than to have one notebook that contains so many notes it ends up causing confusion.
Rename a notebook
- Navigate to the main screen.
- Tap Notebooks.
- Tap Edit.
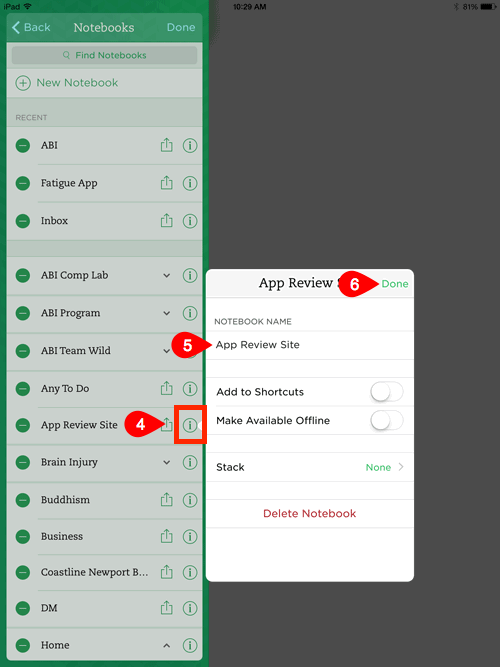
- Tap the Details icon (i.e., circle with the letter i inside) of the notebook whose name will be changed.
- Under “Notebook Name,” tap the name of the notebook to be changed.
- Edit the notebook name.
- Tap Done.
GIVE IT A TRY!
- Rename the “Sample3” notebook to “Sample.”
Notebooks screen edit option
Rename notebook screen
Deleting a notebook
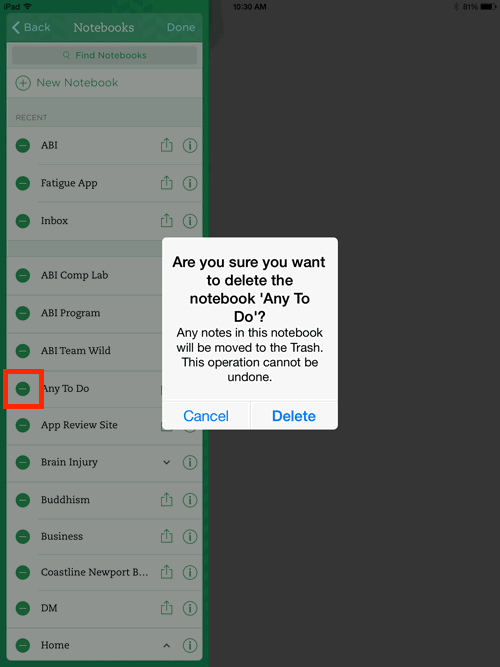
You can always delete unwanted or unused notebooks. Be sure to pay attention to the message the appears when you choose to delete a notebook. Notes inside that notebook will automatically move to the Trash. Move any note you want to keep to an appropriate notebook before deleting its original notebook!
Delete a notebook
Note: Move important notes to another notebook before deleting this one!
- Navigate to the main screen.
- Tap Notebooks.
- Tap Edit.
- Tap Delete icon (i.e., circle with the horizontal line inside) of the notebook to be deleted.
- Read the warning and—if you’ve already moved important notes—tap Delete.
GIVE IT A TRY!
- Delete the “Sample2” notebook.

