Viewing stacks
Stacks are collections of notebooks. In other words, they are notebooks within a notebook. Stacks help to better organize lots of notes. For instance, you could have a stack called Medical and then a separate notebook for each doctor. Stacks are created from existing notebooks.
View existing stacks and their contents
- Navigate to the main screen.
- Tap Notebooks.
- Tap the desired stack to expand it and see the notebooks contained within the stack.
- Tap a notebook within the stack to see its contents.
- Tap a note’s title to open it.
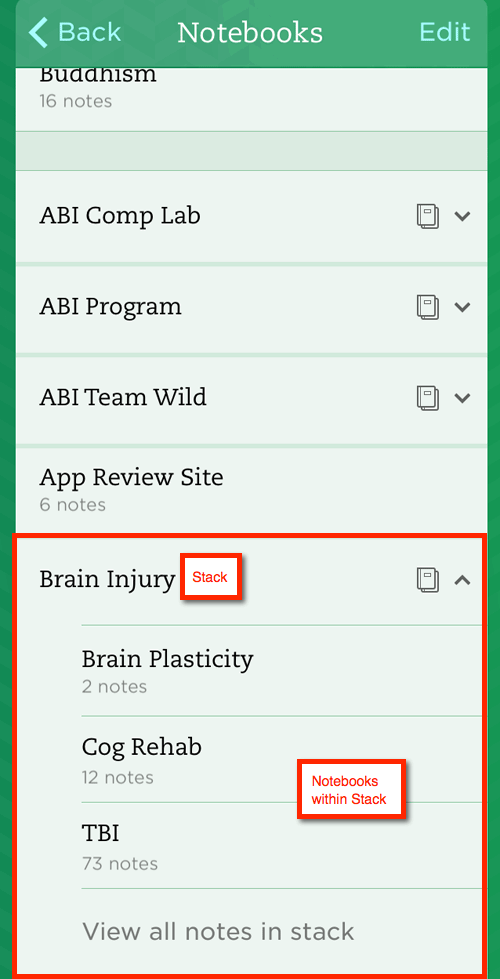
Notebooks within a stack appear indented. In addition, under the notebooks listed there is an option to view all notes within a stack. This option would list all notes in the stack regardless of the notebook to which the note is assigned. Tap a notebook within a stack to see just the notes associated with that notebook.
Stack example
Creating stacks
This part is a bit confusing. Stacks are created from within existing notebooks. In other words, you can’t just create a stack and then start moving notebooks into it. Instead, you create a stack by editing the details of an existing notebook. Here’s how:
Create a new stack
- Navigate to the main screen.
- Tap Notebooks.
- Tap Edit.
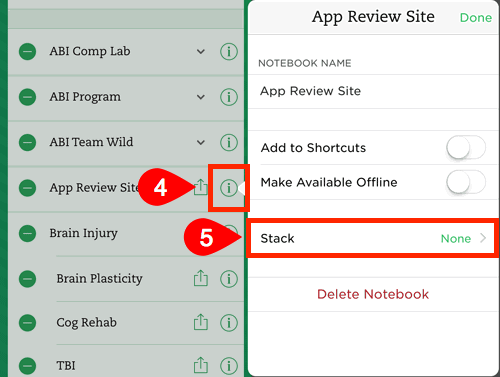
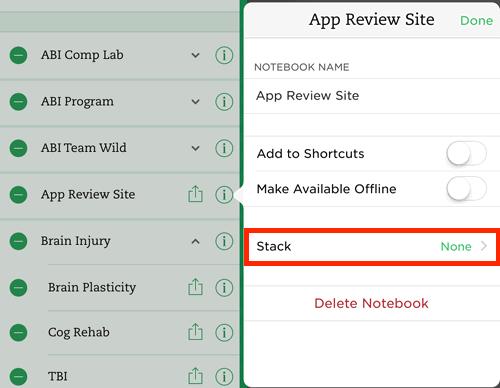
- Tap the Details icon (i.e., circle with the letter i inside) associated with the Notebook that will end up inside the Stack.
- Tap Stack.
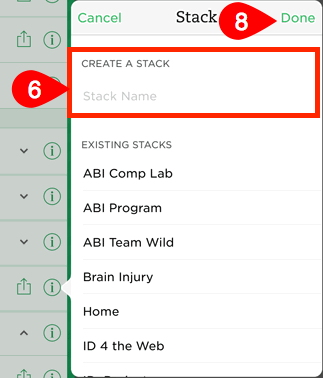
- Under “Create a Stack,” tap the Stack Name field.
- Enter name of new stack.
- Tap Done.
- Tap Done.
GIVE IT A TRY!
Add the following stacks to the Evernote app.
- Add a stack called “Sample Stack” that can be modified and deleted as you progress through this lesson. Associate this stack with the Sample notebook.
- Add a stack called “App Training” associated with the “Evernote Training Session” notebook created previously.
- Add a personal or work-related stack.
Notebook details screen
Stack screen
Assigning notebooks to a stack
You will probably want to assign some notebooks to stacks.
Move a notebook to a stack
- Tap Notebooks from the main screen.
- Tap Edit.
- Tap the Details icon (i.e., circle with the letter i inside) of the notebook to be added to a stack.
- Tap Stack.
- Tap the desired stack.
- Tap Done.
GIVE IT A TRY!
- Add the “Sample1” notebook to the stack named “Sample Stack.”
Select Stack screen
Renaming a stack
You may find that you need to rename a Stack to clarify its contents. It is important that the name of the Stack clearly describe the type of content contained within its Notebooks.
Rename a stack
- Navigate to the main screen.
- Tap Notebooks.
- Tap Edit.
- Tap the Details icon (i.e., circle with the letter i inside) associated with the desired stack.
- Under “Stack Name,” tap the current name of the stack.
- Edit the stack name.
- Tap Done.
- Tap Done.
GIVE IT A TRY!
Rename the “Sample Stack” stack to “Sample Stack Example.”
Stack Name field

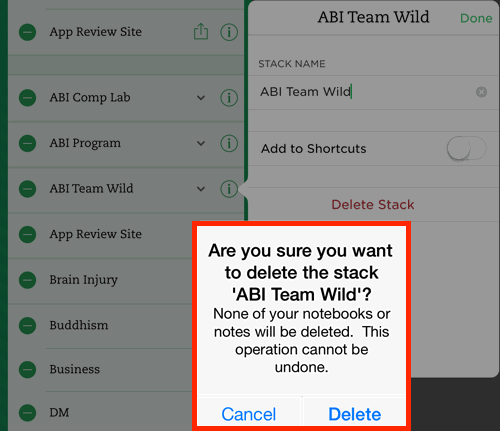
Deleting a stack
You can always delete unwanted or unused stacks. Be sure to pay attention to the message that appears when you choose to delete a stack. Notes inside that stack will be moved out of the stack automatically but will not be deleted.
Delete a stack
- Navigate to the main screen.
- Tap Notebooks.
- Tap Edit.
- Tap the circle with a line in it to the left of the stack to be deleted. Be sure to read the specifics of the delete function.
- Tap Delete Stack.
- Tap Delete to confirm.
- Tap Done.
GIVE IT A TRY!
Delete the “Sample Stack Example” stack created previously.
Delete Stack screen